
Ruins of Dawn Controls
Default keyboard layout, combat bindings, and habits that make isometric loot runs feel smooth in the demo and beyond.
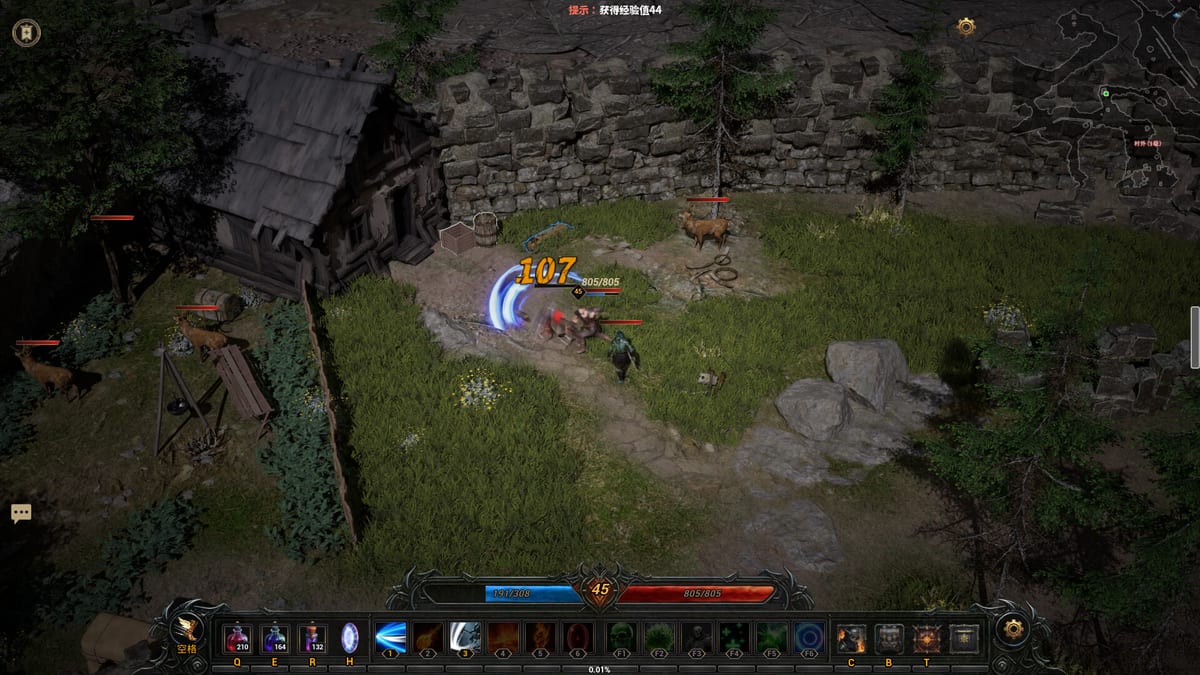
Ruins of Dawn plays as a fast isometric loot ARPG where positioning, target selection, and cooldown discipline matter as much as gear score. The developer has not always shipped a fully rebinding menu in every preview build, so most players rely on a community-documented default layout that matches the RuinsofDawnDemo experience.
This controls guide lists those bindings, explains how they interact in combat, and suggests practice drills that transfer directly to Rift invasions, elite packs, and co-op sessions. Treat it as a living reference — verify keys in your options menu after each demo patch.
Movement and Camera
Ruins of Dawn supports two movement styles that can be combined:
- Right-click to move — classic ARPG pathing; good for precise kiting around telegraphs.
- WASD movement — shooter-style strafing; strong for dodging inward toward a locked target.
Most experienced players mix both: WASD for micro-dodges, right-click for long repositioning across rooms. There is no substitute for spending five minutes in a safe zone testing diagonal movement while your skills are on cooldown.
Camera zoom and rotation (if exposed in your build) should be set once and left alone mid-fight. Re-adjust between zones, not during boss mechanics.
Core Combat Bindings
The following table summarizes the widely reported default layout. Names may differ slightly in localized builds; match by function if your key label differs.
| Action | Default key | Combat role |
|---|---|---|
| Dash | Space | Short invulnerability or distance spike; your primary panic button |
| Lock nearest target | Backtick (`) | Stabilizes single-target rotations and auto-attack |
| Auto-attack | G | Sustained damage while you manage skills and potions |
| Skills (bar 1) | 1, 2, 3, 4, 5, 6 | Core rotation; class kits differ — see Classes |
| Skills (bar 2) | F1–F6 | Extended kit; map cooldown-heavy utilities here |
| Potions | Q, E, R | Three consumable slots; bind by effect (health, mana, cleanse) |
| Town portal | H | Emergency exit to town; saves runs during bad packs |
If you are learning Mage burst patterns or Warlock pet positioning, keep lock and dash on comfortable fingers — usually pinky or thumb for Space and a key near movement for lock.
Target Lock and Auto-Attack
Lock nearest (`) is the hidden skill ceiling in many isometric ARPGs. Toggle lock when you commit to a priority target — elite affix carriers, rift spawns, or boss adds. Unlock when you must kite away and want free-cursor movement.
Auto-attack (G) fills downtime between skill cooldowns. It is not a replacement for skills on Warrior burst windows or Mage area setups, but it prevents standing idle. Combine G with lock for stationary fights; disable lock when circling a telegraphed AoE.
Practice drill: lock a training dummy or weak pack, circle with WASD while holding G, and fire skills on 1–3 without breaking lock. Repeat until dash cancels feel natural.
Skill Bars — 1–6 and F1–F6
Ruins of Dawn exposes twelve skill slots across two bars. There is no universally perfect layout because each class values different cooldowns, but players commonly sort by frequency:
- 1–3: spammable builders or main damage buttons.
- 4–6: longer cooldowns or defensive tools.
- F1–F3: auras, pets, or channeled utilities (Warlock players live here).
- F4–F6: situational buttons — boss interrupts, escape tools, or co-op buffs.
Cross-reference your bar with beginner builds and the class tier list when respeccing. Because you can switch classes anytime, consider mirroring defensive skills to the same physical keys across classes so muscle memory survives swaps.
Potions — Q, E, and R
Three potion binds sounds generous until elite packs apply bleed, mana drain, and burst in the same second. Standardize slots:
- Q: primary health potion — the key your left hand hits without looking.
- E: secondary sustain (health over time, armor, or hybrid flask depending on your build).
- R: utility — mana, cleanse, or speed; some players swap R to a defensive cooldown during Rift Key trials.
In co-op, call out when you are potion-starved so allies can space pulls. Solo players should review potion timing in the Demo Guide routes before pushing harder content.
Town Portal on H
H triggers a town portal — your fail-safe when affix combinations outscale current gear. Good habits:
- Portal before death, not after; death penalties waste more time than a short town trip.
- Restock potions and repair after heavy forging sessions tied to Progression.
- Use portal resets to ID gear calmly; compare affix fractions (
/5rolls) without combat pressure.
Town portals do not replace learning mechanics. They buy time to read the affix glossary and adjust resistances from gear items pages.
Controls for Forging and Inventory
Forging — extract, inject, reforge, upgrade quality — lives in menus rather than combat keys, but inventory friction still costs runs. Between fights:
- Mark five-affix keepers before salvaging duplicates.
- Never extract while distracted; extraction destroys the donor item.
- Link menu habits with Forging builds so you know the next crafting step before you loot the next pack.
The demo tracker helps record which control drills you have practiced if you share accounts or coaches with friends.
Co-op and Communication Overlays
Online co-op does not change the core bindings, but it changes when you dash and lock. Stick to party-agreed focus targets, avoid stealing lock from the player kiting, and keep H portal calls explicit — random town exits split parties in Rift defense.
See Co-op for role splits: Warriors anchoring melee, Mages clearing waves, Warlocks holding pet-safe lines.
Recommended Practice Before Hard Content
- Ten-minute movement drill: WASD circle while locked on a target.
- Skill bar rehearsal: burn F-key utilities once per zone until timings are memorized.
- Potion panic test: let health drop intentionally, confirm Q fires without looking.
- Portal discipline: leave one dangerous pack alive and exit on H before death.
Pair video examples with the embedded gameplay clip on this page, then continue to Getting Started if you have not finished your first demo loop, or Progression if controls feel comfortable but gear pacing does not.
Frequently Asked Questions
Quick answers to the most common questions.
Can I rebind Ruins of Dawn controls?
Preview builds may offer partial remapping. Start from the defaults listed here, then check options after each **RuinsofDawnDemo** patch — see [Getting Started](/guides/getting-started/) for setup.
What is the most important key for survival?
Space dash and H town portal save more runs than extra DPS keys. Practice both in the demo before [Rift invasions](/systems/rifts/).
How should I layout skills on 1-6 and F1-F6?
Put frequent damage on 1–3, long cooldowns on 4–6, and pets or utilities on F-keys. Mirror layouts across [classes](/classes/) if you swap often.
Does auto-attack on G work for every class?
Yes for basic filler, but [Warrior](/classes/warrior/) burst and [Mage](/classes/mage/) AoE still rely on manual skills. Lock (`) keeps G focused on the right target.